Sourdough. Zakwas.

I don’t know what’s so special about sourdough precisely, but there is something. It is one of examples of how humans managed to make nature work for him, when they works for nature. It stands in one line with other fermented foods like sauerkraut, żurek, or cucumbers in brine. And beer, wine, cider.
Nie wiem, co dokładnie jest takiego wyjątkowego w zakwasie, ale coś jest. To jeden z przykładów jak człowiek zdołał sprawić, by natura pracowała dla niego, gdy on pracuje dla natury. W tej samej grupie jest też kapusta kiszona, żurek czy ogórki kiszone. I piwo, wino, cydr.
The general idea here is that you breed lactic bacteria and wild yeast, feed them regularly, and they pay back by multiplying and making your dough the way you’d like it to be.

Rye sourdough
Making sourdough
Mix flour and water, and wait. Repeat. It’s as simple as that. We’ve used same method with wholemeal wheat and wholemeal rye, and brown rice flour. It failed with buckwheat flour. Or maybe it was us who failed – not really important. If you don’t know which one to choose, I suggest rye. My impression is that rye sourdough is the most active from what we have.
You’ll need a container: a jar is OK, plastic one too, as long as you have a lid. Wash it well. At all times try to keep its walls clean. My Mom (yes, she also bakes bread, and it’s only one of her numerous superpowers) had left some sourdough on the walls of her jar, it dried out and mould attacked it. We ended up quickly making a new one. I think I read somewhere that you can recover by intense feeding, but didn’t want to run experiments on my family.
Find a time of day, when you will be able to do something repetitively every twelve hours for the consecutive. It can be 8 a.m. and 8 p.m. for instance.
Find somewhere warm. It usually means around 20-25 C. The lowest I heard anyone made their sourdough in was 18 C or so. Hi Marcin!

Wheat sourdough
Ingredients
- 400 g flour of your choice
- 400 g water
Day 1, day 2: add 50 g of flour and 50 g of water to the jar and mix thoroughly. Leave it somewhere warm for 24 hours.
Day 3, day 4, day 5: add 50 g of flour and water and mix thoroughly, then leave in a warm place for 12 hours and repeat (two feedings a day).
If at any point it fills half of the container, before feeding give it a good stir and discard half of it. Sourdough may grow at a rate you did not expect, escape the container and get messy. Some recommend doing so every time. I didn’t.
You can see some action happening quite early, or you may have to wait longer. There is no rule, really. I remember first bubbles on day two. If it looks as if it’s not working, or not working quickly enough, give it more time (feed for a couple days more), make sure it’s not too cold.
I remember that usually around day three or four the dough could double in volume. Even if it does, don’t stop, continue feeding it according to the schedule.
When the sourdough preparation succeeds, it’s time to start baking. Whatever recipe you choose (I recommend something simple, like the one below if you’re ok with wheat), it might not come out super consistent at first. Your sourdough is still young and needs to stabilise its content of yeast and bacteria. After a month or two you will have a panzerdough, resilient to most things you do wrong, or don’t do well. Now make sure you have enough children and grandchildren willing to carry on baking or give it to no one – it’s your precious!
You can name your sourdough. Some people do, I haven’t (yet). The nicest name I heard of was Claudette. Justin Gellatly from Bread Ahead claimed once that most people in his courses call theirs Bob. I was thinking about a vote for name, but that could make Boaty McBoatface a really nice, serious name. We’ll see.

Rice sourdough
Care, storage
We store our blob in the fridge and feed it usually every week or two, or when there’s not much left. Some people keep it on the worktop in the kitchen and feed it frequently, daily or so.
Feeding works just like preparation. Work out what amount of sourdough is fine for your needs and add equal amounts of flour and water to have enough.
Let’s say you plan to use 100 g a week. Keep 200 g (to have something to feed after you use the amount you want) and after taking 100 g out add 50 g of flour and 50 g of water, and mix.
Leave it out to get nice and bubbly, and put it back into the fridge when it stops growing.
Remember one rule to follow in life: if it’s important, have a backup. That’s why we store five boxes of sourdough, not three: two with rye, two with wheat, and one rice flour(because meh). It payed off twice so far. It is possible to dry and freeze your sourdough, but I didn’t try it. It will also most probably survive a year or two without feeding, hidden in your fridge. I haven’t tried it either, but saw a video of it. I don’t see any reason why anyone would lie oh the Internet.
First bread
I was wondering which recipe would be the best to start. Damian, our friend, recently started with a wheat-rye loaf, but I decided to suggest something different. Last year I went to an open day at Bread Ahead in Borough Market and was given a beginner’s sourdough cheat sheet. I have never baked using this recipe before, so here it is.
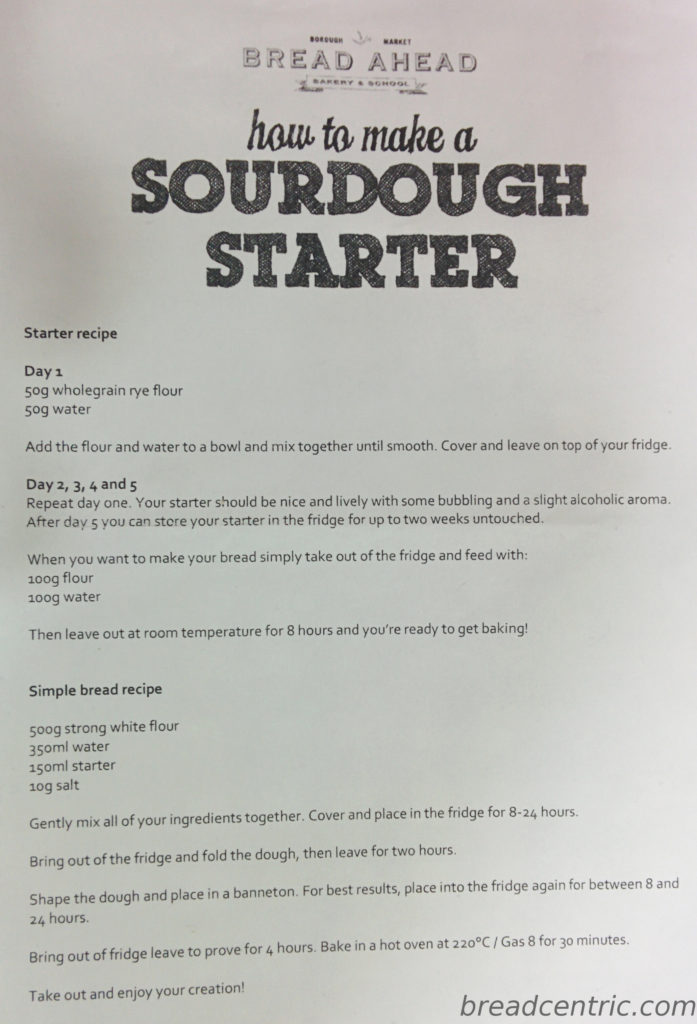
Bread Ahead recipe cheat sheet
The recipe is very flexible in terms of timing. I started in the morning and had a loaf the following day evening. It could be less if I had a non-working day, but this recipe is supposed to adjust to you, not the other way round.
Just a note: this will likely not work with gluten free starter (although I can’t give a reasonable explanation why). Besides, I don’t think you make gluten free sourdough to bake gluten rich loaves. I do not know easy gluten free bread recipes, sorry.
Ingredients
- 500 g strong wheat flour
- 150 g sourdough
- 350 g water
- 10 g salt
Preparation
Mix all ingredients in a bowl, cover and put into a fridge for 8-24 hours (13 hours in our case)
Take it out, fold and leave in the warm for 2 hours
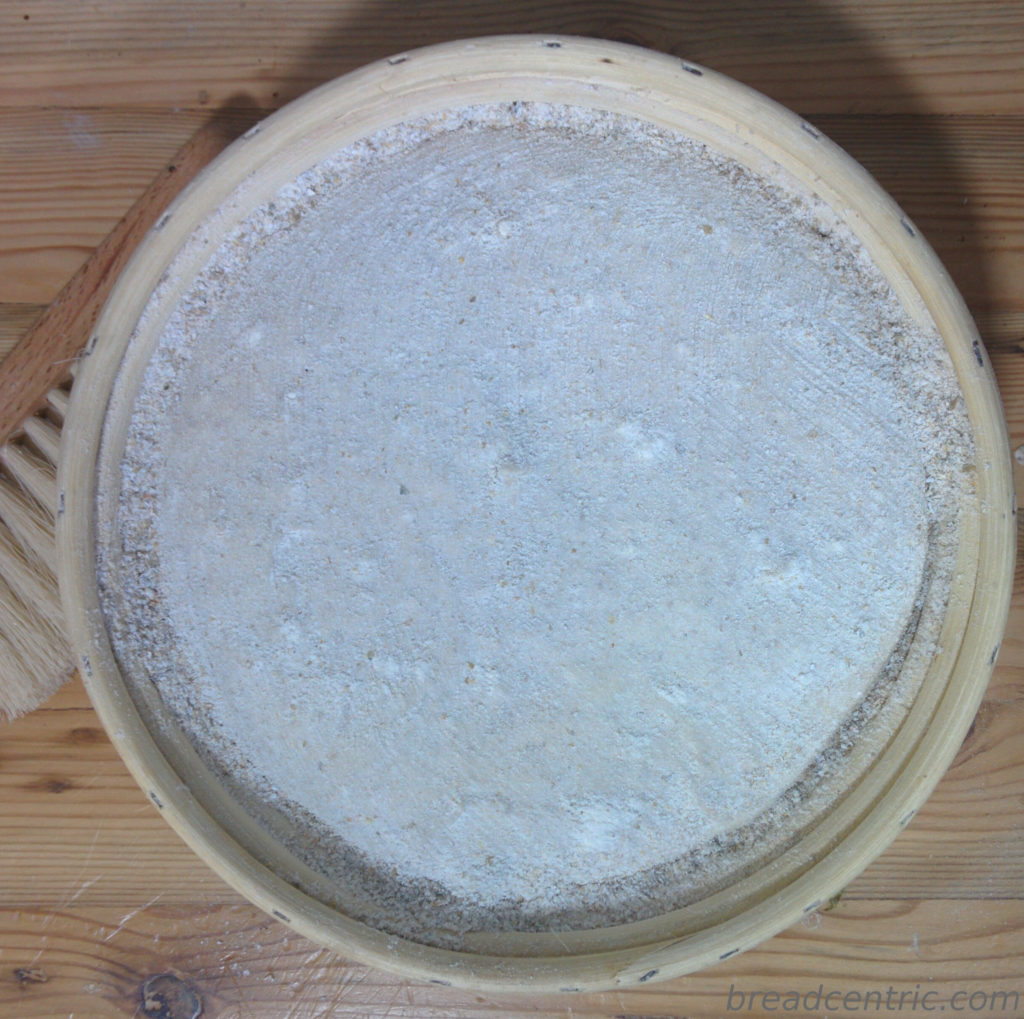
Shape the dough into a loaf and put into a floured banneton. I recommend whole rye flour for flouring, or rice flour. If you don’t have a banneton use a bowl with floured clean tea towel in it. Cover and put it into a fridge for 8-24 hours (we did 20 hours and was a bit too much, read below)
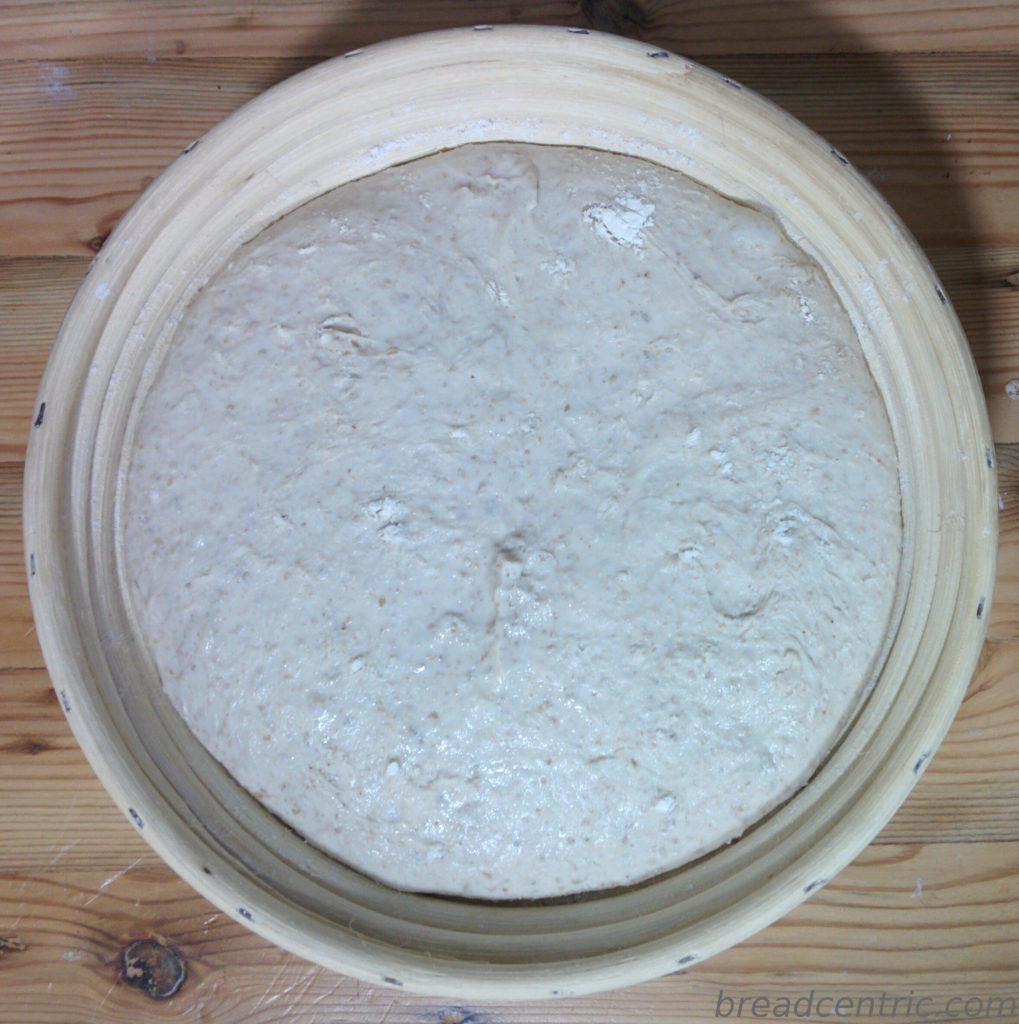
Dough in a banneton
Take it out, leave in the warm for four hours. After three and a half, set your oven to 220 C, without convection (up and down, or down only). It is also recommended to put an oven friendly dish at the bottom of your oven with water in it to introduce steam. It will make the loaf work better in the oven. Some people just throw ice cubes at the bottom. They evaporate gradually releasing the steam without leaking
Flip the banneton to place the loaf on a baking tray. If the dough is sticky, before flipping, I spread a little flour on it. This prevents it from sticking to the tray. Score it with a sharp knife and bake for 30 minutes
Floured bread base
You’ll know that the loaf is ready when you knock on the bottom and hear a hollow sound. If you are unsure, give it 5-10 more minutes. Take the bread out, let it cool on a cooling rack
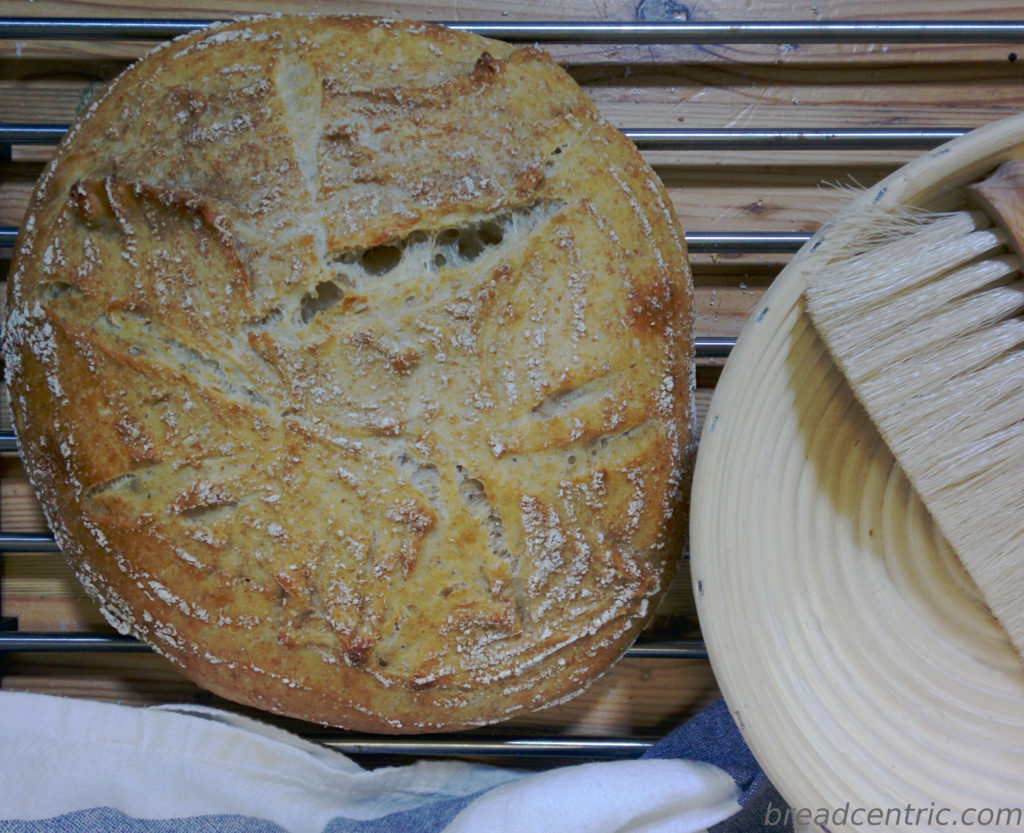
Baked loaf
Cooling off the bread is a whole process in which the moisture of crumb still escapes softening the crust and stabilising the whole loaf. I do recommend giving it more time on the rack, just cover it with a tea towel.
It sometimes happens, that you have high hopes, and it doesn’t work. Especially when you begin your adventure with bread, and when you gain some confidence, it will hit you even more. Do not get discouraged.
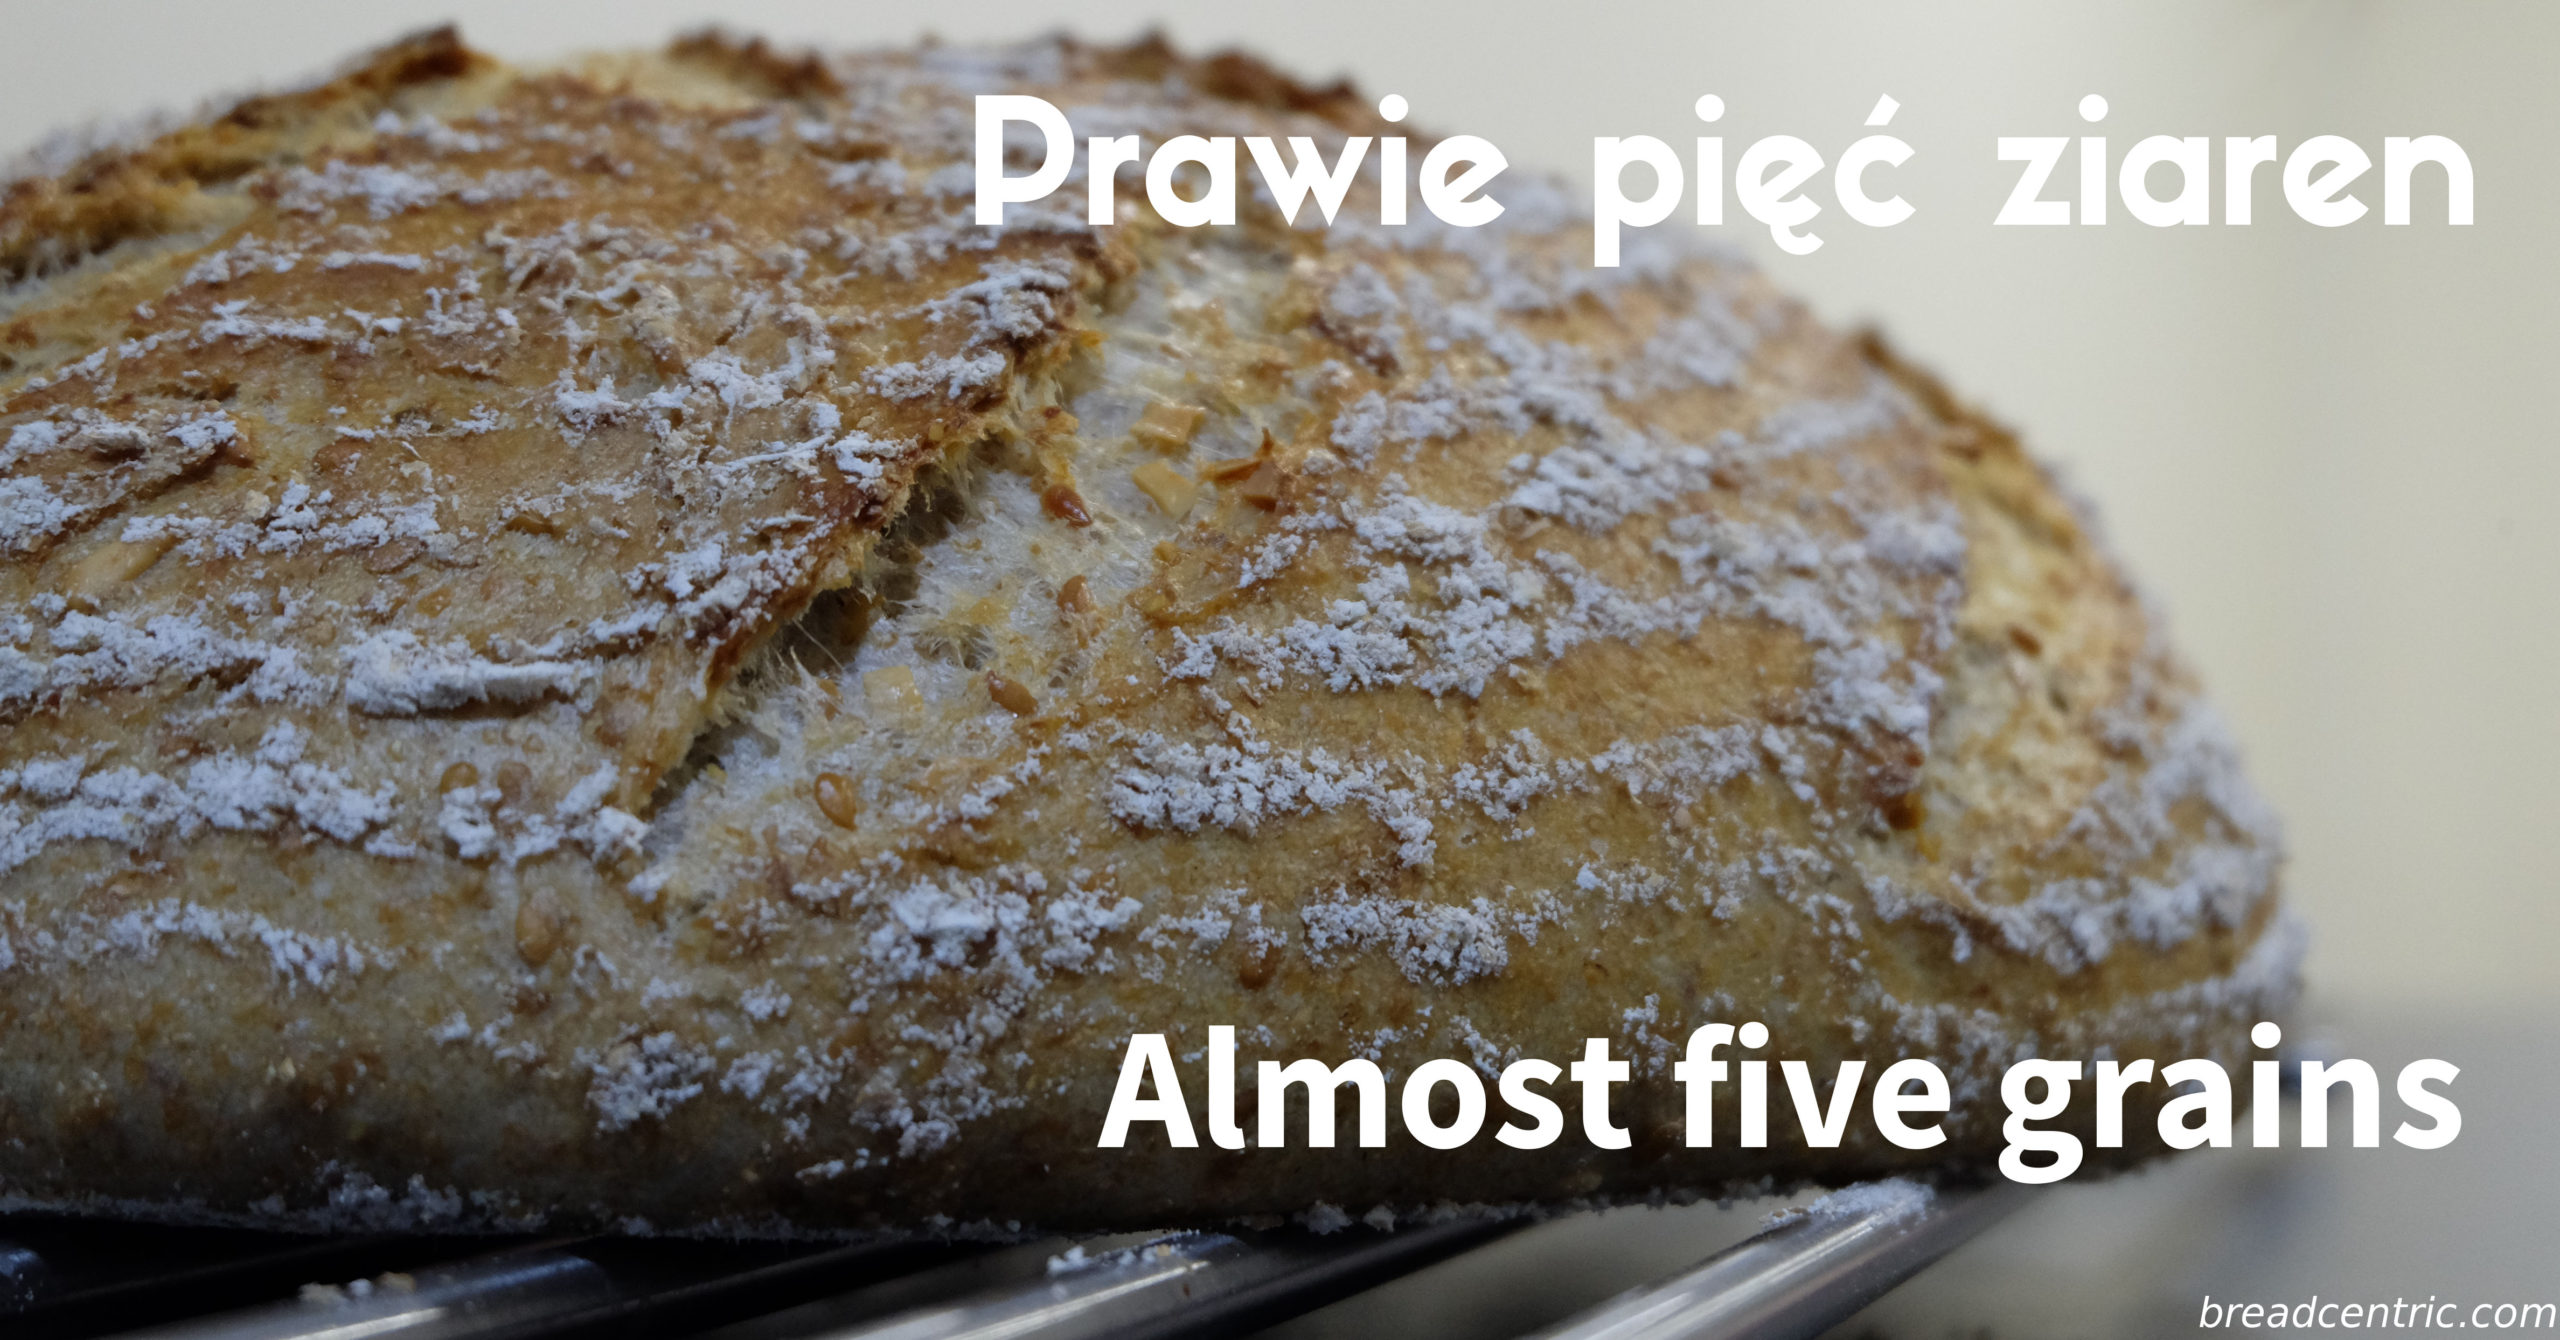
The dough stuck to the banneton, and it lost its shape before it detached. Also, I think it was a bit overproofed as the bread went very flat on the tray. Luckily it did rise in the oven, but I would be happier with more expansion.
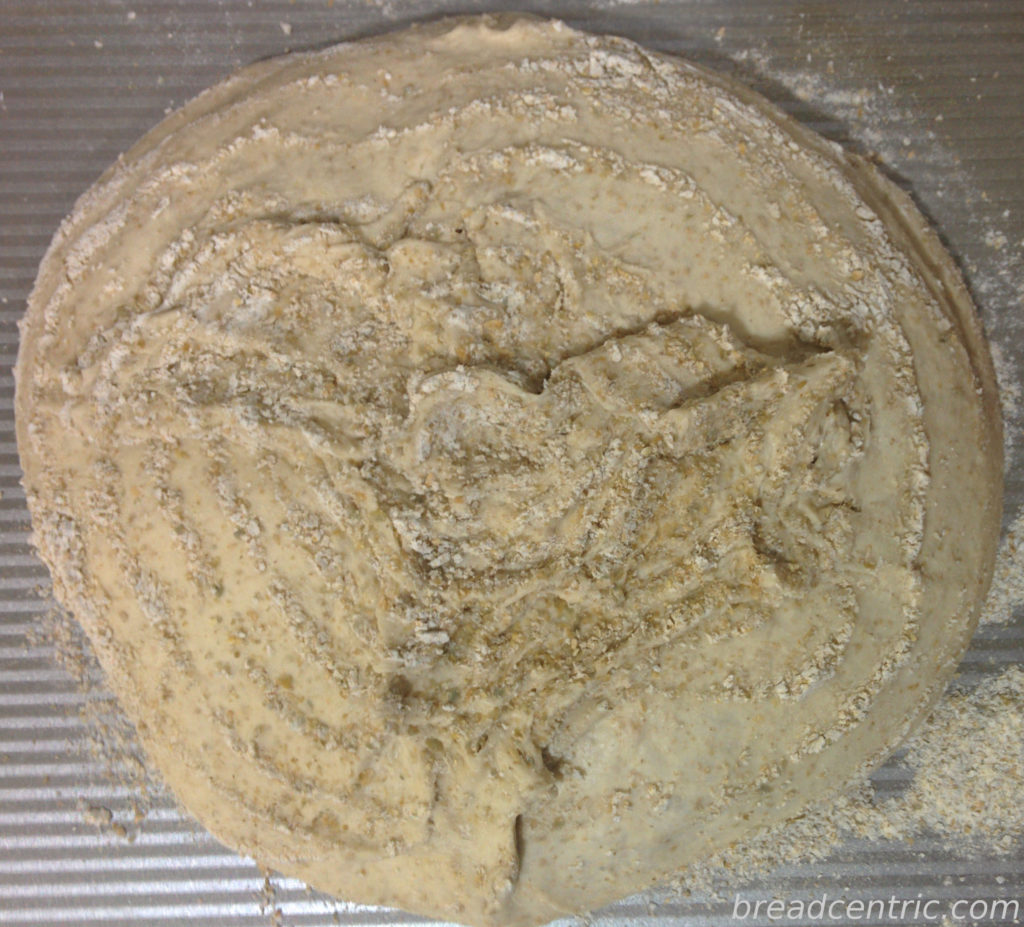
Dough surface damaged because of sticking to the banneton
Something seems not to be right with the timing. While the first rising could be longer, the second one was too long. If I were to do it once again now, I would mix it in the morning, then next morning would shape it (early wake up), and then take it out and bake in the evening. And I would use a cloth in the banneton.
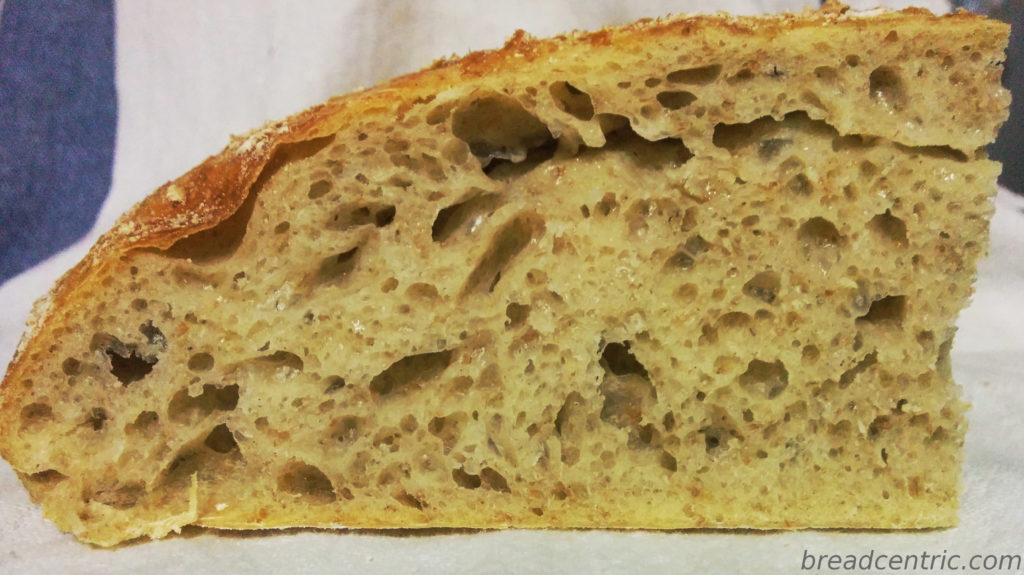
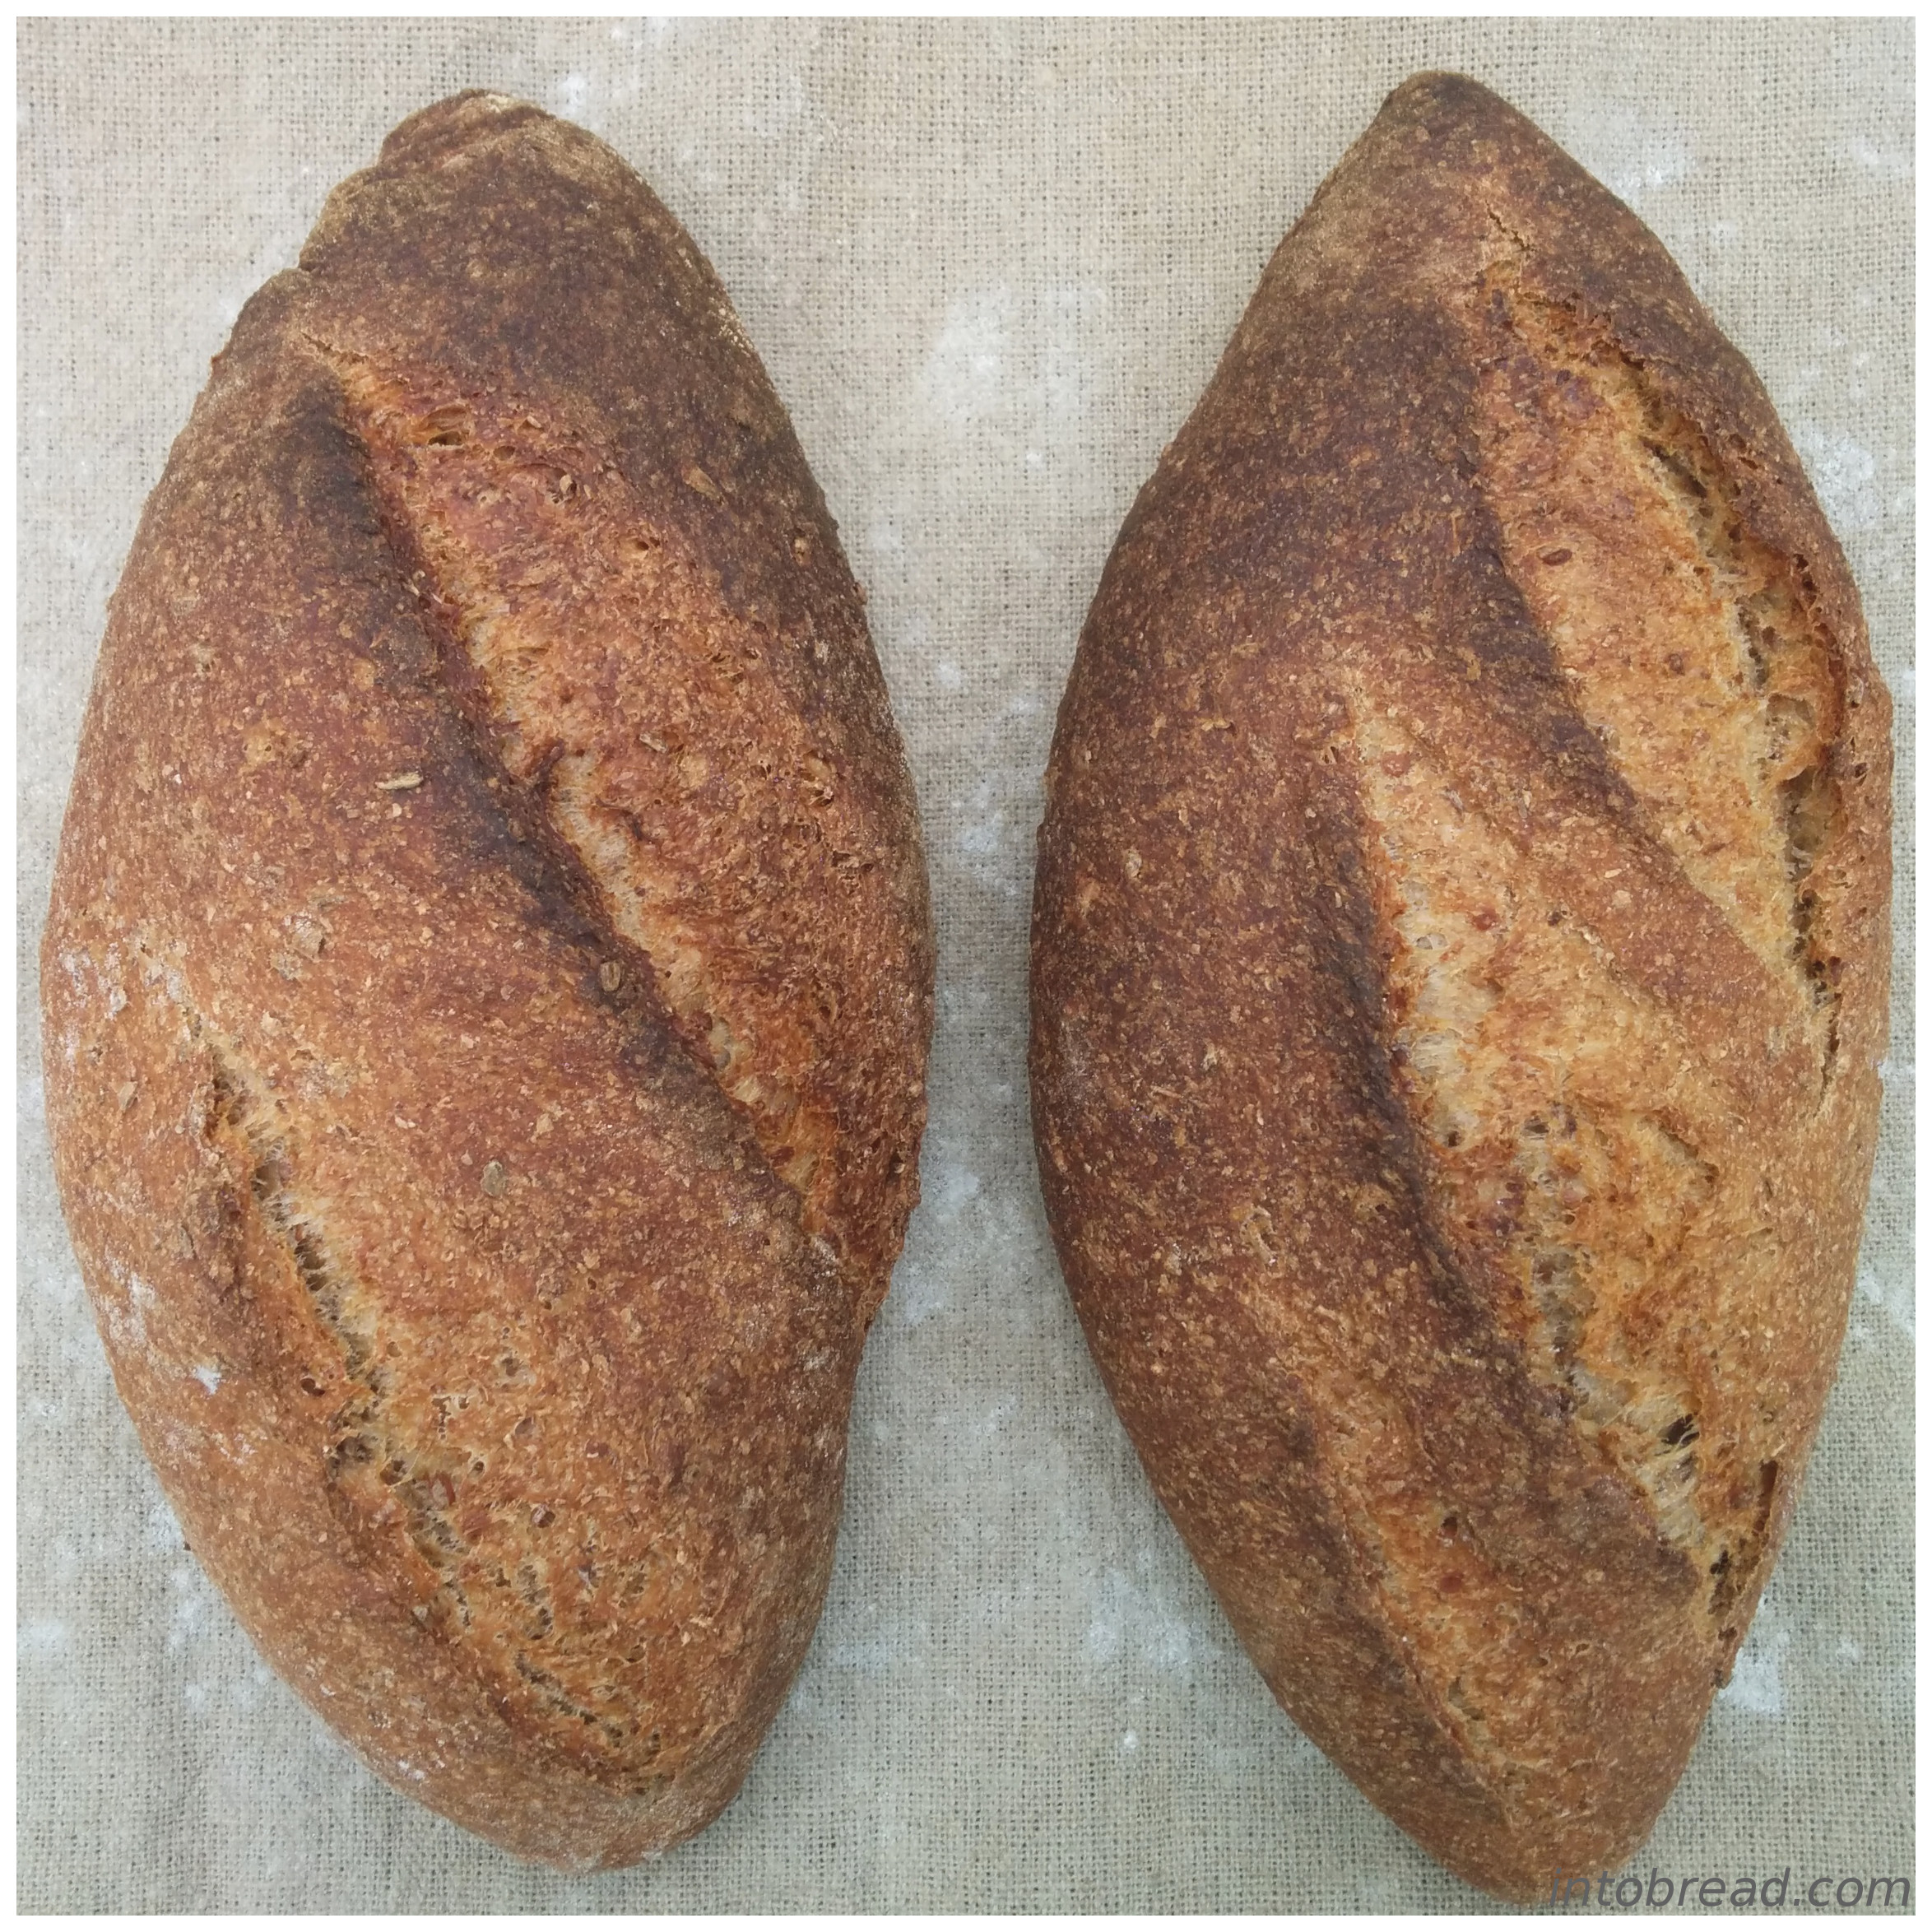
The crumb (torn dough seen in the upper section)
Still, it was a very tasty bread. I would be very happy if my first loaf was like this.